Oi, photgraphers…
- Started
- Last post
- 16 Responses
- 5timuli

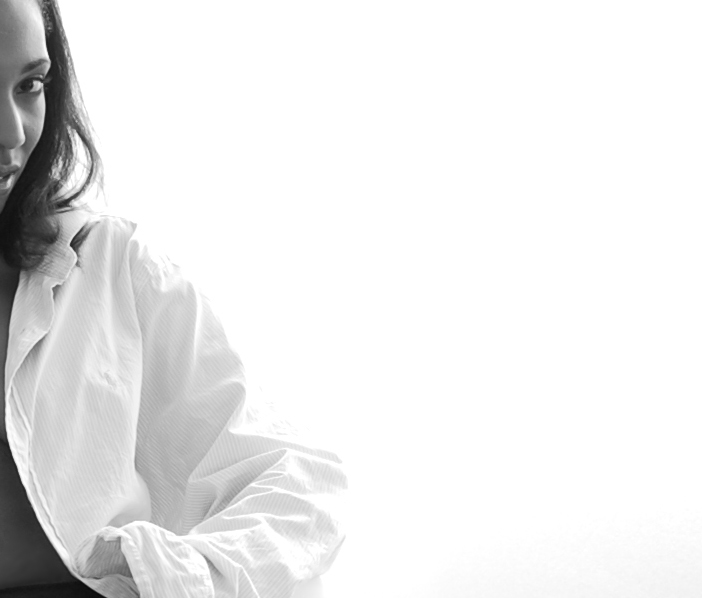
This example shot was taken by a professional but we have a temp who needs shot and we need to do it ourselves. We have a Nikon D80 and a light kit at our disposal, but don't have any other info from the initial shoot. Is there a method of replicating this effect using Photoshop from a standard-lit photograph? I know this isn't a lot of info to go on, and pardon my ignorance when it comes to photography... I just thought I'd ask.
- version30
there is someone in the show some recent work thread that can help you
- OSFA0
That's the example you going by?
I'm no expert, but the face looks waaay overexposed! I think they used one light (subject) and maybe one for the bg. Try using one light left of camera, something to bounce on the right so that shadows are not that strong and one for bg. Like I said, I'm no expert, but that's how I would do it... ;)
- oh, and if you have an extra, use it as hairlight ;)OSFA
- epic_rim0
make the curves like this.
its a start.

- 5timuli0
The original shoot there were 2 of those umbrella light thingies, with a spotlight on the face. The overexposed face was intentional. I think the general consensus here is that if you have no knowledge of lighting techniques, it won't work and most likely it can't be replicated using only Photoshop :/
- 5timuli0
I mean I have enough knowledge of Photoshop (been using it 10yrs+) to creat high-contrast over-exposed images, but not in the same way as is done here. The new image has to sit alongside the others and look part of the same series.
- OSFA0
now, do you need help on how to get chicks to pose naked for you? ;)
- forcetwelve0
looks like a umbrella/speedlite to the left close, and one to the right a little further away.
also looks like it's been adjust heavily in PS to get that high contrast/over exposed look.
just shoot them all and run them through lightroom or bridge RAW processor and adjust the exposure.
- It looks like Jared from Subway without glasses.mg33
- look up three posts, forcetwelve:
http://www.qbn.com/t…bigtrick
- CALLES0
looks posterized to me
- raskolnikov0
a couple of 45º lights and a bit of the ol' multiply blending mode should do the trick tbh
this looks like mainly post to me
- the fuck do I know?raskolnikov
- that black & white logos on portfolios are not your cup of teaversion3
- SoulFly0
Just photograph everyone again with your own method.
Sounds silly but probably the best solution.
- ItTango0
Yeah, this is 'shopped... probably using Exposure & Shadow/Highlight controls. Looks like he was overexposed initially.
Don't know what kind of kit you have, but if you've got at least one decent sized umbrella and strobe, use the reflective side and spread the light as much as possible. Find/create the most color free backdrop you can, move subject just far enough away from backdrop to avoid shadow. If you have another light, throw against your backdrop.
Shoot it RAW so you'll have the most control over the image in PS.
- rusty_ace0
i was able to pull it off reasonably close in PS, but it was a pain in the ass, at the scale you posted it was pretty easy to replicate but on a larger scale i think it would be much harder and much more time consuming i had 12 layers of levels adjustments and overlays all manually erased..sort of reverse dodge and burning. that was from a standard lit photo, one with a hair light would have been easier.
- ItTango0
No, it should never be that difficult if you set it up right the first time. A well lit background with your camera focused tightly on your subject at an iso of about 200 will get you this...